Plugins
To get the most power out of MazeMap Indoor Maps, you can add functionality with Leaflet plugins.
Version compatibility
To check if a plugin is compatible, you need to look at the documentation for each plugin and see which Leaflet versions they are tested with. The MazeMap JS API is based on Leaflet 1.0.0, so any plugin should be compatible with at least that version of Leaflet to work in the MazeMap JS API.
You can check the exact Leaflet version the MazeMap JS API is using by looking at the Maze.leafletVersion property.
Disclaimer
If you are using a custom or 3rd party plugin, you are responsible for ensuring to keep this plugin up to date and compatible with the Leaflet version that is being used in the MazeMap JS API.
We cannot guarantee that every plugin will work seamlessly with the MazeMap JS API in every circumstance.
Heatmap plugin example
The ability to visualize heatmaps on top of floorplans is a much requested feature. This can easily be achieved using our maps as baselayers and adding a 3rd party heatmap plugin. In this example, we are using the Leaflet.Heat plugin, developed by Vladimir Agafonkin (@mourner)
Including the plugin file
Since most Leaflet plugins usually use the L (Leaflet) global namespace, we need to expose the Maze namespace:
<script>
    // the Maze namespace is an extension of the L namespace
    // Make a reference to enable compatibility with plugins that use the L namespace
    window.L = window.Maze;
</script>
Then include the plugin you want to use, like such:
<!-- The leaflet heatmap plugin. Get your own from https://github.com/Leaflet/Leaflet.heat -->
<script src='../../example-plugins/Leaflet.heat/leaflet-heat.min.js'></script>
For this example, we also use a custom data set of points. This file just creates a global indoorHeatPoints, containing an array of Maze.LatLngs.
<!-- Example data set -->
<script src='../../example-plugins/Leaflet.heat/example-indoor-heatpoints-data.js'></script>
Namespace disclaimer
This example assumes a vanilla JavaScript application. Bundling your Javascript files using tools such as browserify or webpack will require extra work to expose a L global to the plugin code.
Writing a web application which uses the plugin
And now, initialize the map as usual, and use the plugin functionality. Note that we can use Maze.heatLayer instead of L.heatLayer:
var map = Maze.map('mazemap-container', {
    campusloader: false,
    doubleClickZoom: false
});

Maze.Instancer.getCampus(1).then(function(campus){

    map.setView( {lat: 63.417668368136496, lng: 10.403929352760317}, 18);

    campus.addTo(map).setActive().then( function(c) {
        map.setZLevel(1);
    });

    var heatMap = Maze.heatLayer(indoorHeatPoints, {maxZoom: 22, max: 1, radius: 20, blur: 20}).addTo(map);

    map.on('click', function(e){
        // For this demo, you can click the map to add points dynamically
        heatMap.addLatLng(e.latlng);
    });
});
Voilà!
Now, you can visualize anyhing you want on top of indoor floorplans! Isn't that amazing?
Tip: Try clicking the map to add manual heatmap points...
Pulse icon for user's position
This example will use L.Icon.Pulse to display the user's position.
As with the heatmap plugin, we'll expose the L namespace, and include the plugin's files:
<script>
    // the Maze namespace is an extension of the L namespace
    // Make a reference to enable compatibility with plugins that use the L namespace
    window.L = window.Maze;
</script>

<!-- The leaflet plugin. Get your own from https://github.com/mapshakers/leaflet-icon-pulse/ -->
<script src='../../example-plugins/Leaflet.Icon.Pulse/L.Icon.Pulse.js'></script>
<link href="../../example-plugins/Leaflet.Icon.Pulse/L.Icon.Pulse.css" rel="stylesheet">
Then a pulsing icon can be created:
var pulsingIcon = Maze.icon.pulse({iconSize:[20, 20],color:'blue'});
var marker = Maze.marker([63.4176, 10.403929352760317], {
    icon: pulsingIcon
}).addTo(map);
We can fetch the user position with the Maze.Map.locate() method (which works
exactly like L.Map.locate()).
This method of locating a user might succeed or fail. How to handle failures
depends on the business logic of each case; but for this example we'll just
place the user in a default place:
function addPulsingIcon(latlng) {
    var pulsingIcon = Maze.icon.pulse({iconSize:[20, 20],color:'blue'});
    var marker = Maze.marker(latlng, {
        icon: pulsingIcon
    }).addTo(map);
}

map.on('locationfound', function(ev) {
    addPulsingIcon(ev.latlng);
});

map.on('locationerror', function(ev) {
    // Add a pulsing icon in a default place
    addPulsingIcon([63.4176, 10.4039]);
    map.setView([63.4176, 10.4039], 18)
});A more ellaborate example would be to re-request the user position every few seconds,
and move the marker with the Maze.Marker.setLatLng() method (which works just
as L.Marker.setLatLng()).
The default Maze.Map.locate() geopositioning method uses geoIP and GPS only - the
indoor location capabilities of the JS API can be used instead in some campuses in
a similar way.
Scanned floor maps
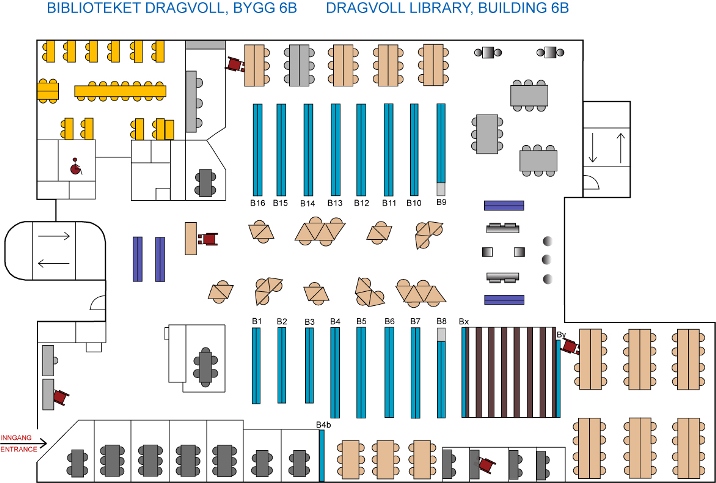
Some buildings already have digital maps of their floors, but they might not be zoomable or interactive. Using the MazeMap JS API and Leaflet.ImageOverlay.Rotated.
For this example we'll use one of the library floorplans of the NTNU Dragvoll library, which looks like this:
As with other plugins, we'll expose the L namespace and include the plugin's files:
<script>
    window.L = window.Maze;
</script>
<!-- The leaflet plugin. Get your own from https://github.com/IvanSanchez/Leaflet.ImageOverlay.Rotated -->
<script src='../../example-plugins/Leaflet.ImageOverlay.Rotated/Leaflet.ImageOverlay.Rotated.js'></script>
Leaflet.ImageOverlay.Rotated needs to be provided the latitude-longitude
coordinates of the image. In this case, they are:
var point1 = Maze.latLng({ lat: 63.40854806527257, lng: 10.470657348632814 }),
    point2 = Maze.latLng({ lat: 63.40848563267132, lng: 10.471566617488863 }),
    point3 = Maze.latLng({ lat: 63.40828932928003, lng: 10.470567494630814 });
Then create an instance of L.ImageOverlay.Rotated as explained in the
L.ImageOverlay.Rotated documentation:
var overlay = Maze.imageOverlay.rotated("path/to/dragvoll6b.jpg", point1, point2, point3, {
    opacity: 1
});
That could be added to the map with overlay.addTo(map). Instead, we'll wrap it in
an instance of Maze.LayerGroup.ZDemuxer so it will only show in the floor it
belongs to. That ZDemuxer can then be added to the map:
var zoverlays = Maze.layerGroup.zDemuxer({ 3: overlay }).addTo(map);The following example does just that, plus loading a campus by default, setting a floor, and allowing the user to see the corners of the image.